Roblox Fe Gui Script
Shooter is a highly accurate ballistics calculator for iOS and Android. Fast, intuitive, and trusted by long-range shooters and hunters everywhere.
$19.99 — one-time purchase, free updates forever
Shooter is a highly accurate ballistics calculator for iOS and Android. Fast, intuitive, and trusted by long-range shooters and hunters everywhere.
In the world of Roblox development, "FE" stands for FilteringEnabled , a foundational security system that dictates how information travels between players (clients) and the game server. A Roblox FE GUI Script is a user interface designed to work within this architecture, ensuring that actions triggered by the player are properly replicated—or secured—across the entire game. Understanding FilteringEnabled (FE) Introduced as a mandatory requirement in 2018, FilteringEnabled stops unauthorized changes made by a single player from affecting everyone else. The Client (Player): When you click a button on your screen, that action is "local." Without a bridge to the server, changing your GUI text or character's color will only be visible to you. The Server: To make a change visible to all players, the server must be the one to execute the command. The Bridge: Developers use RemoteEvents and RemoteFunctions to send a "request" from the client's GUI to the server to perform a specific action. Core Components of a GUI Script Building an FE-compatible GUI requires several moving parts within Roblox Studio . YouTube·AlvinBloxhttps://www.youtube.com Roblox Filtering Enabled Tutorial - Spawning Parts from GUI
1. LocalScript (in StarterGui ) -- LocalScript inside a ScreenGui (e.g., StarterGui.PaperGUI) local player = game.Players.LocalPlayer local mouse = player:GetMouse() -- Create GUI elements local screenGui = Instance.new("ScreenGui") screenGui.Name = "PaperGUI" screenGui.ResetOnSpawn = false screenGui.Parent = player.PlayerGui local frame = Instance.new("Frame") frame.Size = UDim2.new(0, 400, 0, 300) frame.Position = UDim2.new(0.5, -200, 0.5, -150) frame.BackgroundColor3 = Color3.fromRGB(255, 255, 255) frame.BorderSizePixel = 2 frame.Visible = false frame.Parent = screenGui -- Draggable local drag = false local dragStart, startPos frame.InputBegan:Connect(function(input) if input.UserInputType == Enum.UserInputType.MouseButton1 then drag = true dragStart = input.Position startPos = frame.Position end end) frame.InputEnded:Connect(function(input) if input.UserInputType == Enum.UserInputType.MouseButton1 then drag = false end end) frame.InputChanged:Connect(function(input) if drag and input.UserInputType == Enum.UserInputType.MouseMovement then local delta = input.Position - dragStart frame.Position = UDim2.new(startPos.X.Scale, startPos.X.Offset + delta.X, startPos.Y.Scale, startPos.Y.Offset + delta.Y) end end) -- Title bar local titleBar = Instance.new("TextLabel") titleBar.Size = UDim2.new(1, 0, 0, 25) titleBar.BackgroundColor3 = Color3.fromRGB(80, 80, 80) titleBar.Text = "📄 My Paper" titleBar.TextColor3 = Color3.fromRGB(255, 255, 255) titleBar.Font = Enum.Font.SourceSansBold titleBar.TextSize = 18 titleBar.Parent = frame -- Close button local closeBtn = Instance.new("TextButton") closeBtn.Size = UDim2.new(0, 40, 1, 0) closeBtn.Position = UDim2.new(1, -40, 0, 0) closeBtn.BackgroundColor3 = Color3.fromRGB(200, 50, 50) closeBtn.Text = "X" closeBtn.TextColor3 = Color3.fromRGB(255, 255, 255) closeBtn.Font = Enum.Font.SourceSansBold closeBtn.Parent = titleBar -- TextBox (editable area) local textBox = Instance.new("TextBox") textBox.Size = UDim2.new(1, -10, 1, -35) textBox.Position = UDim2.new(0, 5, 0, 30) textBox.BackgroundColor3 = Color3.fromRGB(240, 240, 240) textBox.Text = "" textBox.TextWrapped = true textBox.TextScaled = false textBox.MultiLine = true textBox.ClearTextOnFocus = false textBox.Font = Enum.Font.SourceSans textBox.TextSize = 14 textBox.Parent = frame -- Save button local saveBtn = Instance.new("TextButton") saveBtn.Size = UDim2.new(0, 80, 0, 30) saveBtn.Position = UDim2.new(1, -90, 1, -35) saveBtn.BackgroundColor3 = Color3.fromRGB(100, 150, 100) saveBtn.Text = "Save" saveBtn.TextColor3 = Color3.fromRGB(255, 255, 255) saveBtn.Font = Enum.Font.SourceSansBold saveBtn.Parent = frame -- Open/Close logic local openKey = Enum.KeyCode.P -- Press P to open/close -- Load saved text from LocalStorage local savedText = player:GetAttribute("PaperText") or "" textBox.Text = savedText -- Close button function closeBtn.MouseButton1Click:Connect(function() frame.Visible = false end) -- Save button function (stores in player attribute + localStorage) saveBtn.MouseButton1Click:Connect(function() local newText = textBox.Text player:SetAttribute("PaperText", newText) -- Optional: Fire RemoteEvent to save on server -- game.ReplicatedStorage.SavePaperEvent:FireServer(newText)
-- Visual feedback saveBtn.BackgroundColor3 = Color3.fromRGB(150, 200, 150) task.wait(0.2) saveBtn.BackgroundColor3 = Color3.fromRGB(100, 150, 100)
end) -- Toggle GUI with P key mouse.KeyDown:Connect(function(key) if key == string.char(openKey.Value) then frame.Visible = not frame.Visible if frame.Visible then -- Refresh text from attribute textBox.Text = player:GetAttribute("PaperText") or "" end end end) -- Initially show tutorial hint local hint = Instance.new("TextLabel") hint.Size = UDim2.new(0, 200, 0, 30) hint.Position = UDim2.new(1, -210, 1, -40) hint.BackgroundColor3 = Color3.fromRGB(0, 0, 0, 180) hint.Text = "Press P to open paper" hint.TextColor3 = Color3.fromRGB(255, 255, 255) hint.Font = Enum.Font.SourceSans hint.TextSize = 14 hint.Parent = screenGui task.wait(5) hint:Destroy() Roblox FE GUI Script
2. Optional Server Script (for saving to DataStore) If you want the paper's text to persist across server hops and rejoin, use a Script in ServerScriptService : -- Server Script (for DataStore) local DataStoreService = game:GetService("DataStoreService") local paperStore = DataStoreService:GetDataStore("PlayerPaperData") game.Players.PlayerAdded:Connect(function(player) local userId = player.UserId local success, data = pcall(function() return paperStore:GetAsync(userId) end) if success and data then player:SetAttribute("PaperText", data) else player:SetAttribute("PaperText", "") end
end) game.Players.PlayerRemoving:Connect(function(player) local userId = player.UserId local text = player:GetAttribute("PaperText") if text then pcall(function() paperStore:SetAsync(userId, text) end) end end) -- Optional RemoteEvent for real-time saving local remote = Instance.new("RemoteEvent") remote.Name = "SavePaperEvent" remote.Parent = game.ReplicatedStorage remote.OnServerEvent:Connect(function(player, newText) player:SetAttribute("PaperText", newText) -- Also save to DataStore immediately if desired local userId = player.UserId pcall(function() paperStore:SetAsync(userId, newText) end) end)
Features
✅ Press P to open/close paper GUI ✅ Draggable window ✅ Multi-line editable text ✅ Saves text locally (per session) using SetAttribute ✅ Optional persistent save using DataStore (server script) ✅ Clean and simple paper-like design
How to Use
Put the LocalScript inside a ScreenGui in StarterGui (Optional) Put the Server Script in ServerScriptService for permanent saving Playtest – press P to open your paper GUI In the world of Roblox development, "FE" stands
To create a professional and effective post for a Roblox FE (FilteringEnabled) GUI script, you should focus on clarity, features, and proper formatting. Whether you are posting on the Roblox Developer Forum , Discord, or a script-sharing hub, follow this structured template to gain trust and views. Proper Post Template [Title] Make it clear and descriptive. [RELEASE] [FE] | & [Header Image/Video] Show, don't just tell. A 30-second showcase video or a high-quality screenshot of the interface is the best way to get people to use your script. [Description] Explain what the GUI does and why it’s useful. "Hey everyone! I’m excited to share [GUI Name] , a lightweight and fully FilteringEnabled-compatible tool designed for [Game/Purpose] . It includes a clean, modern interface and is optimized to run smoothly without lag." [Key Features] Use bullet points to highlight the best parts. Feature 1 : (e.g., "Full FE Support—works on all servers.") Feature 2 : (e.g., "Customizable themes (Dark/Light mode).") Feature 3 : (e.g., "Anti-ban protections and optimized performance.") [How to Use/Installation] Give clear instructions to avoid support questions. Copy the script provided below. Open your preferred executor. Inject and execute the code. Press [Keybind] to toggle the GUI. [The Script] Always use code blocks with syntax highlighting to make it readable. -- [[ GUI Script Name ]] -- -- [[ Created by: YourName ]] -- loadstring(game:HttpGet("https://githubusercontent.com"))() Use code with caution. Copied to clipboard Best Practices for High Engagement Code Etiquette : Use three backticks (```) to wrap your code so it doesn't look messy. Credits : Always credit anyone whose work you used or was inspired by (e.g., "UI design inspired by [Name]"). Safety First : Mention that your script is safe and has been tested. Avoid posting "malicious" or "server-destroying" scripts on official forums, as this can lead to account bans. Support : Add a link to your Discord server or a "Bug Report" thread so users can give you feedback. FE Part Controller GUI Script - ROBLOX EXPLOITING
Mastering Roblox FE GUI Scripts: The Ultimate Guide to Filtering Enabled If you have ever tried to create a Click-to-Collect game, a lethal Knife, or a simple Button that gives Cash in Roblox, you have likely encountered the infamous "Replication Error." Your GUI works perfectly in Studio but does nothing when you play the live game. This is where the Roblox FE GUI Script comes into play. FE (Filtering Enabled) is no longer just an option; it is Roblox’s mandatory security system. In this comprehensive guide, we will break down exactly how to write, implement, and troubleshoot FE-compliant GUI scripts, ensuring your game is secure, functional, and hacker-resistant.
Clean, intuitive interface designed by shooters for shooters.
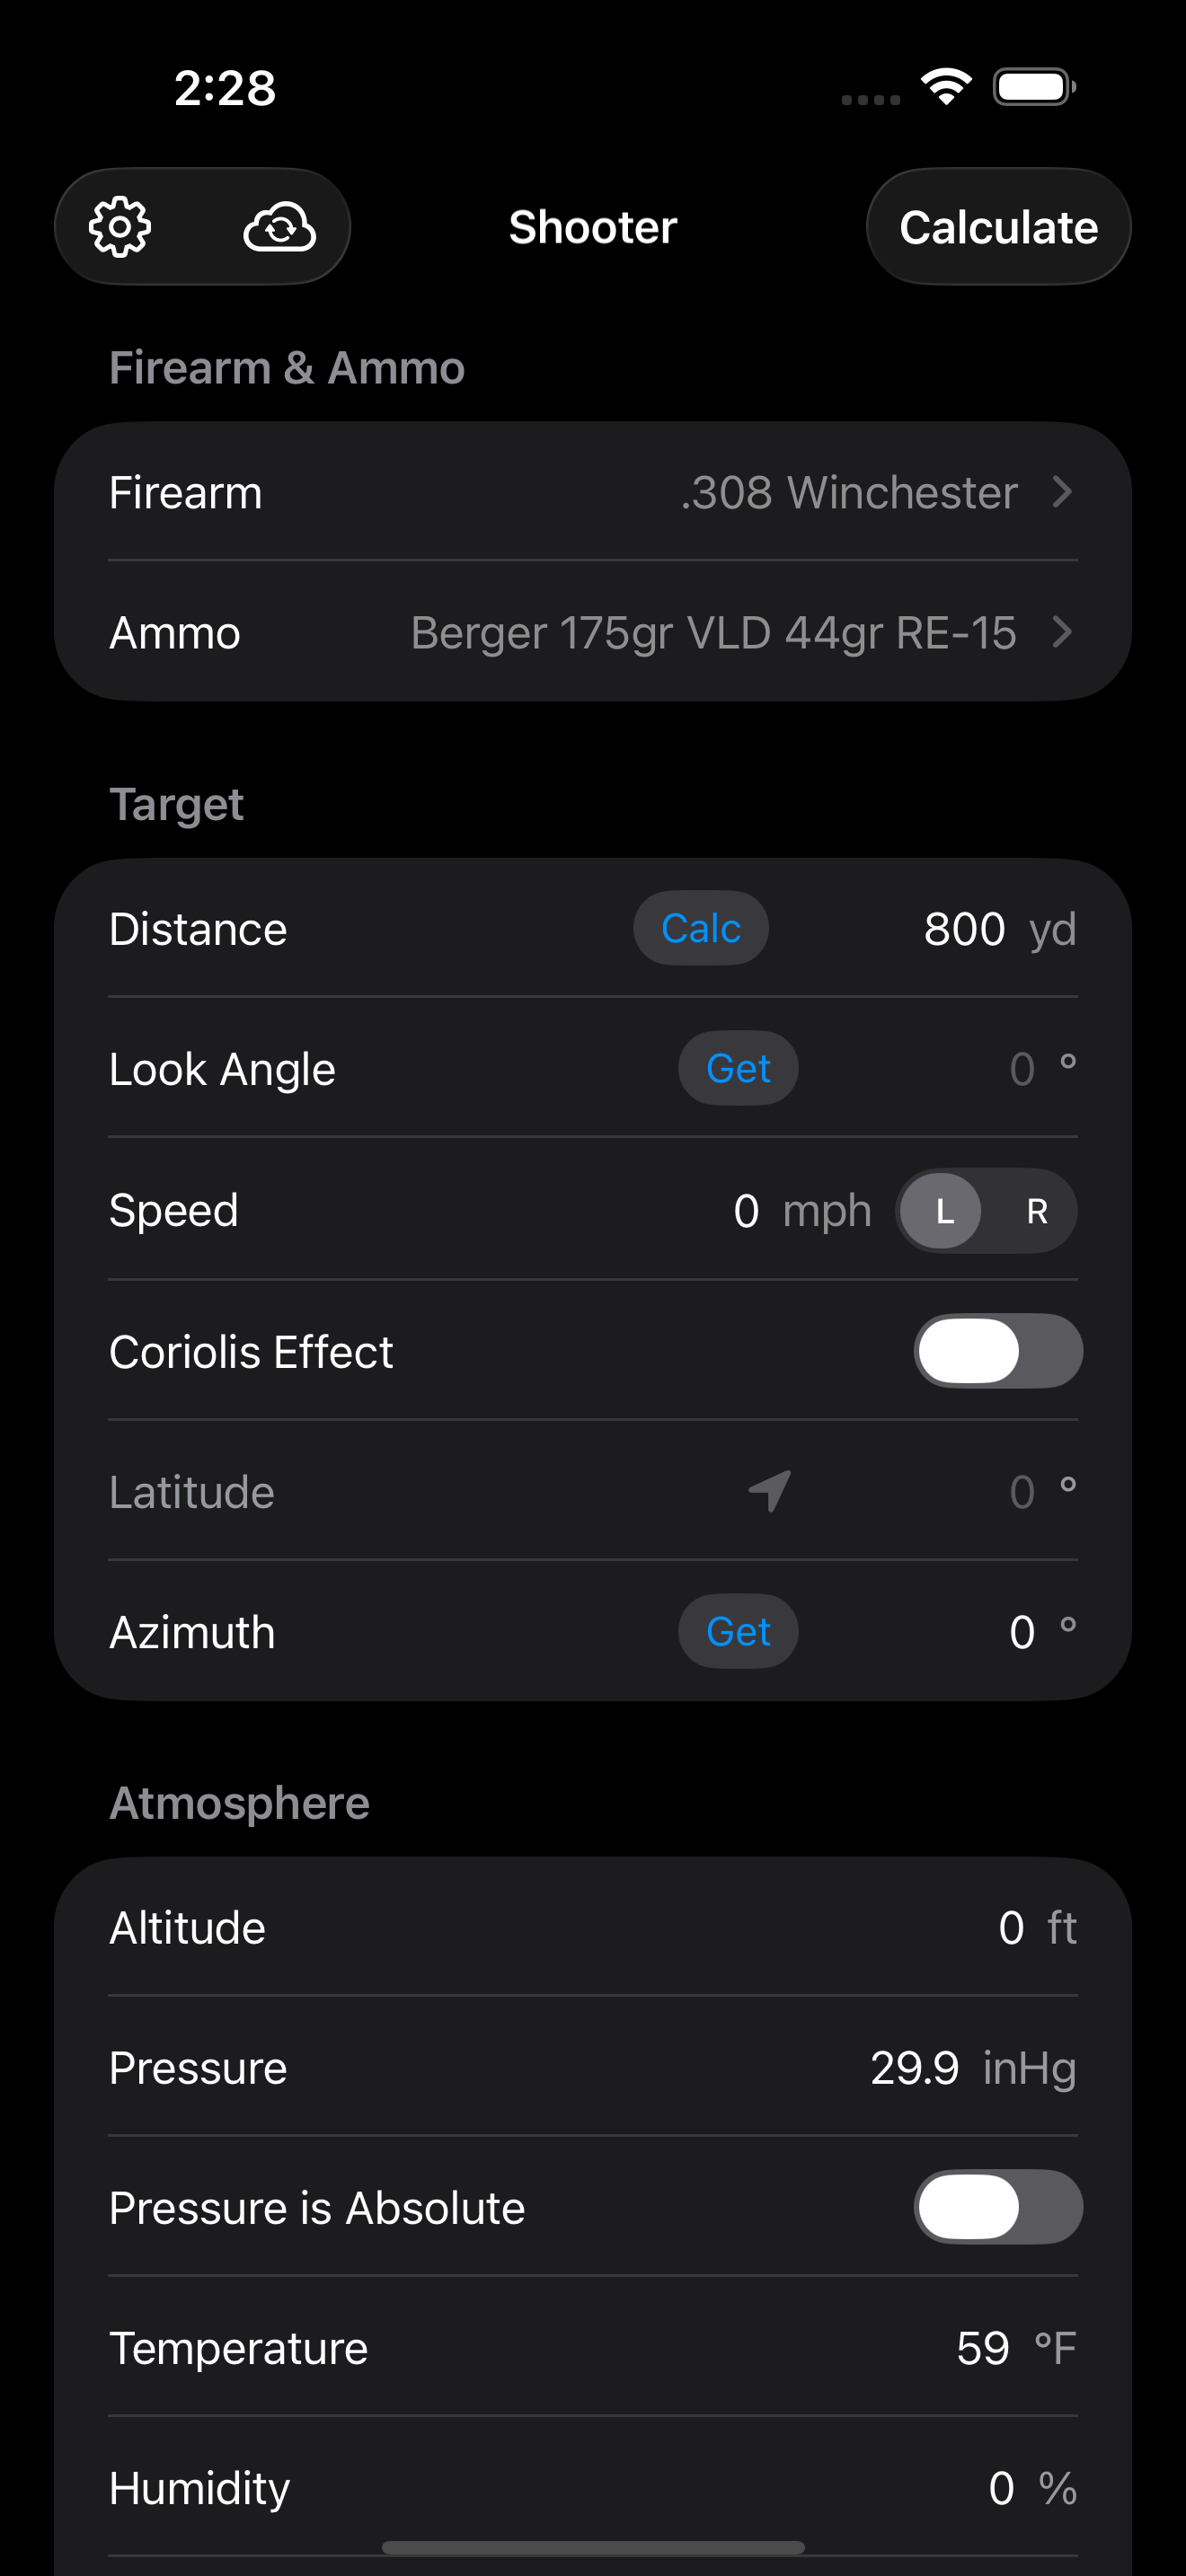 Main Screen
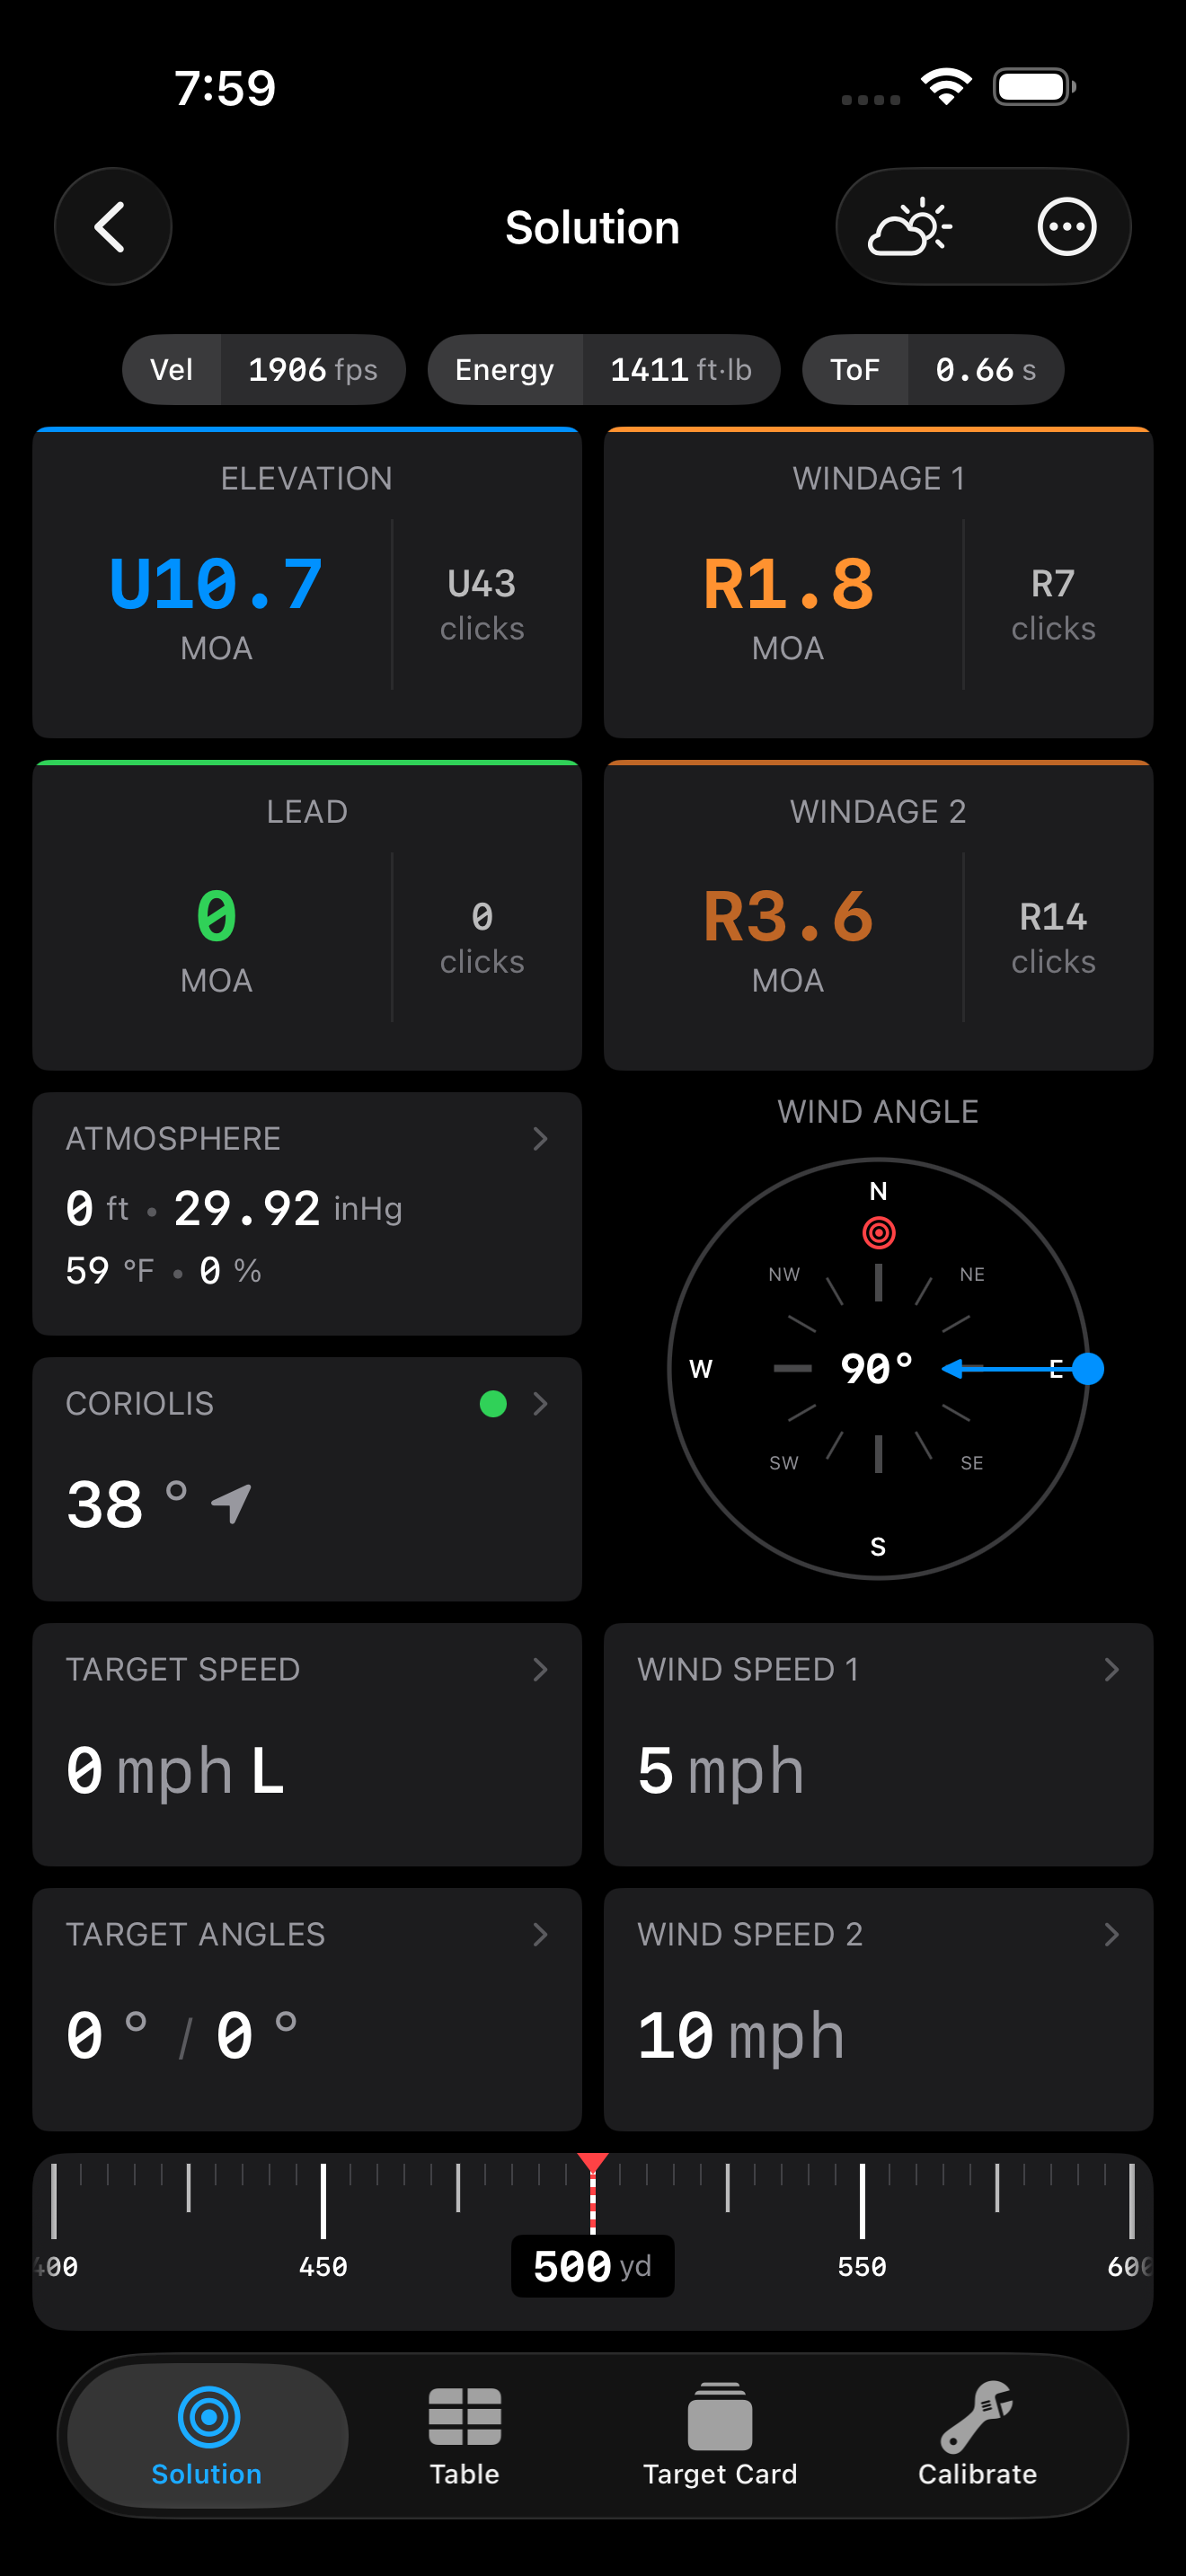 Solution Screen (Advanced)
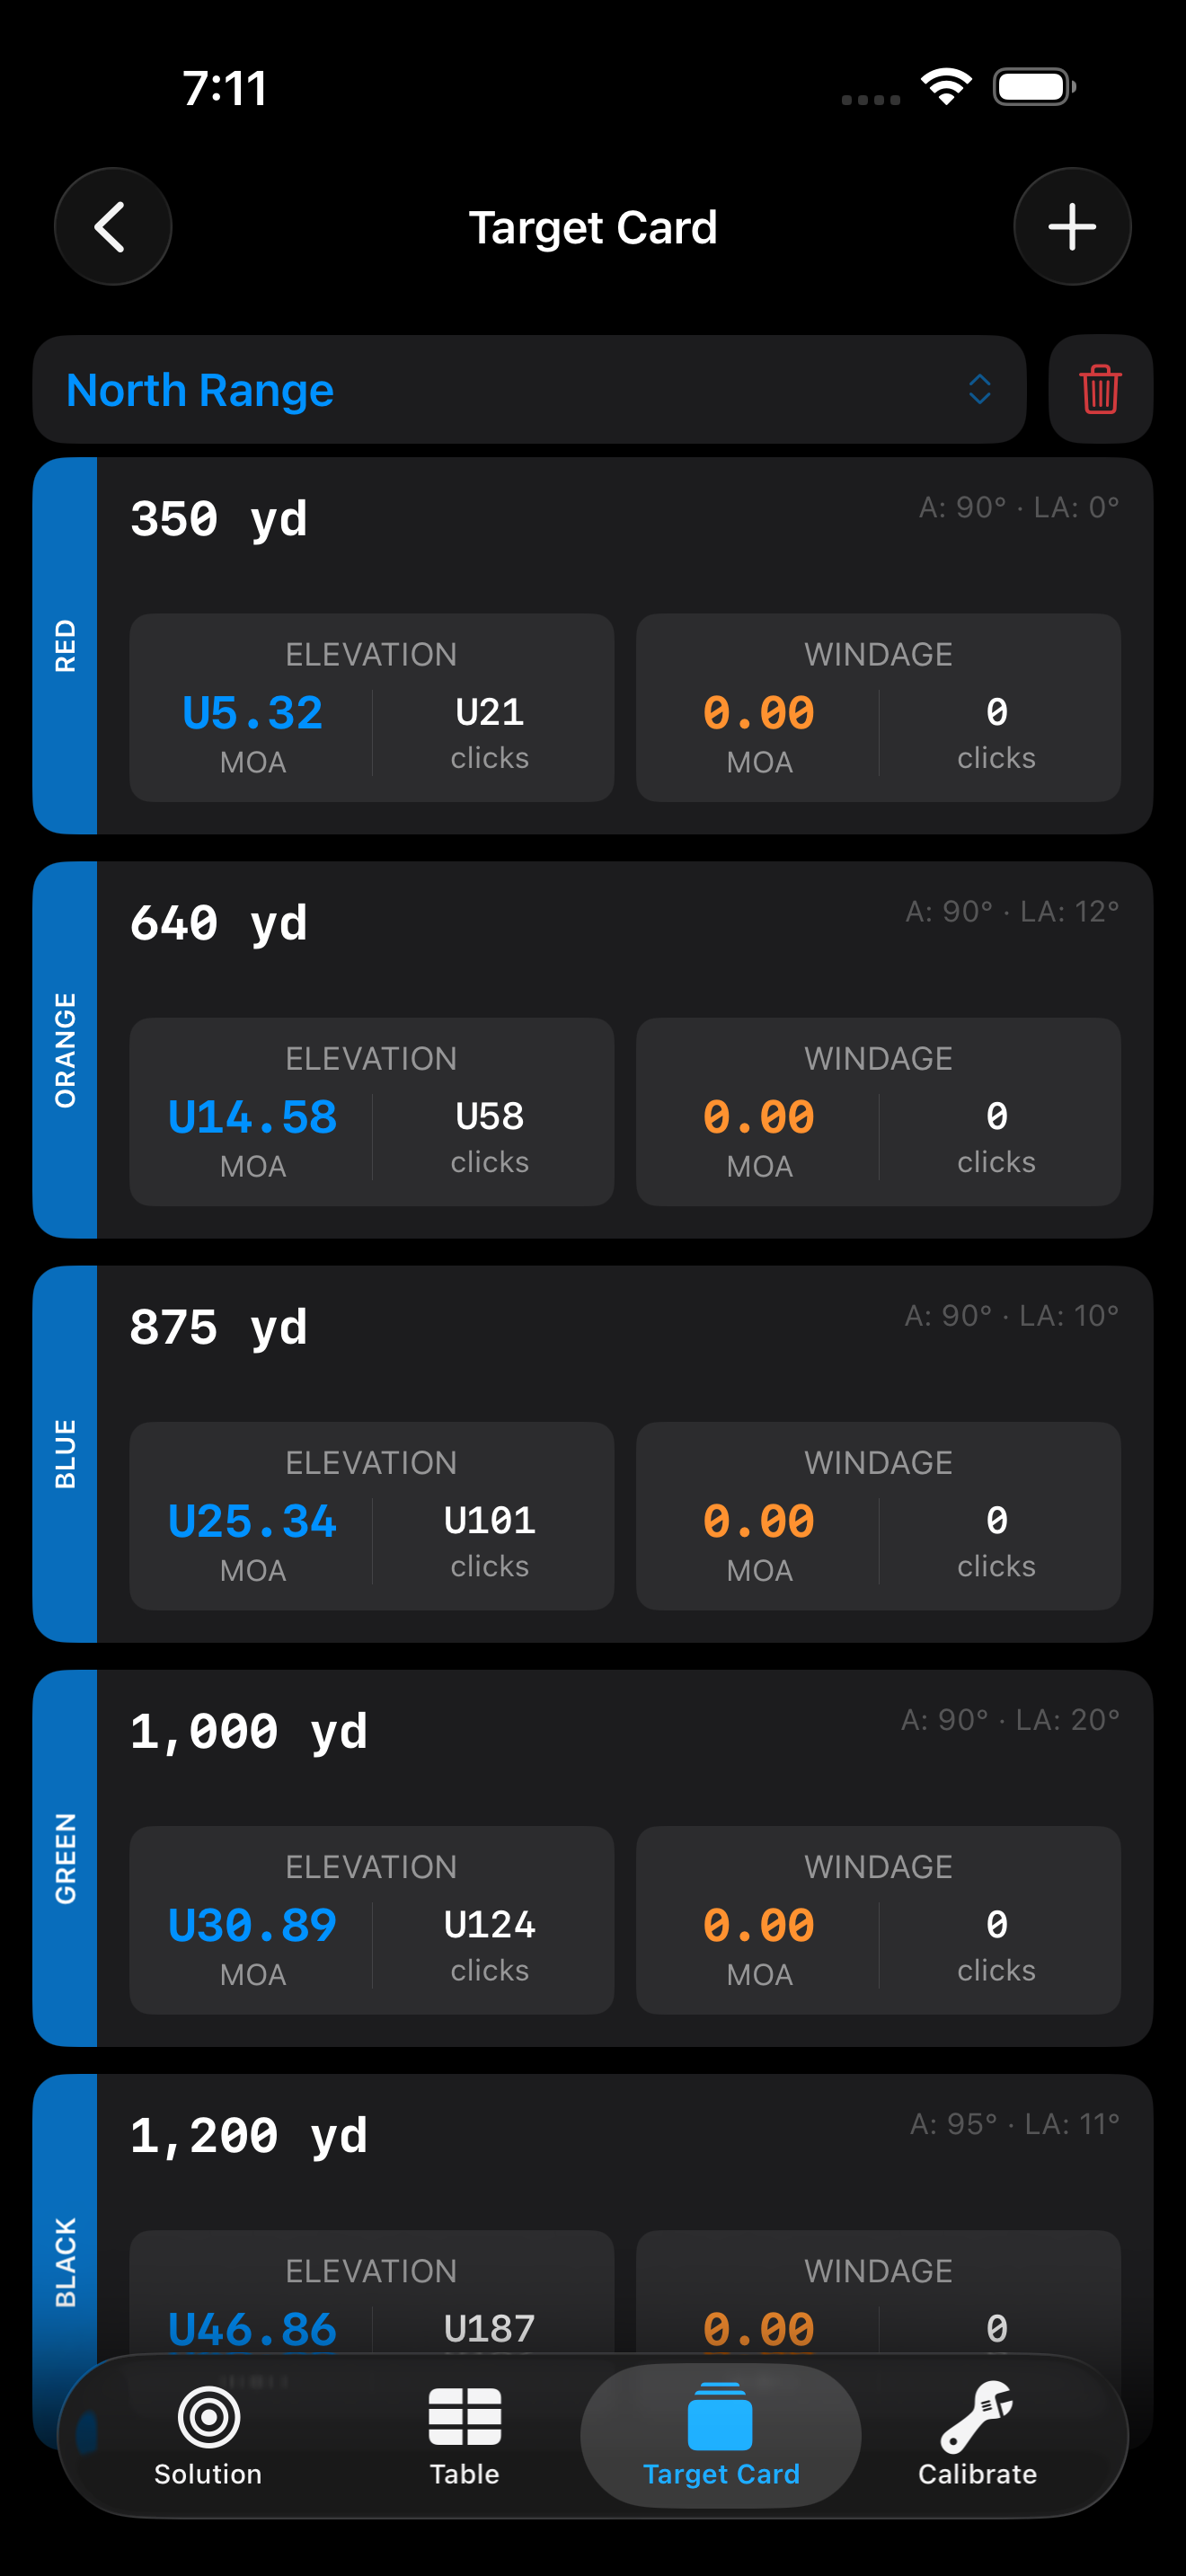 Target Card Example
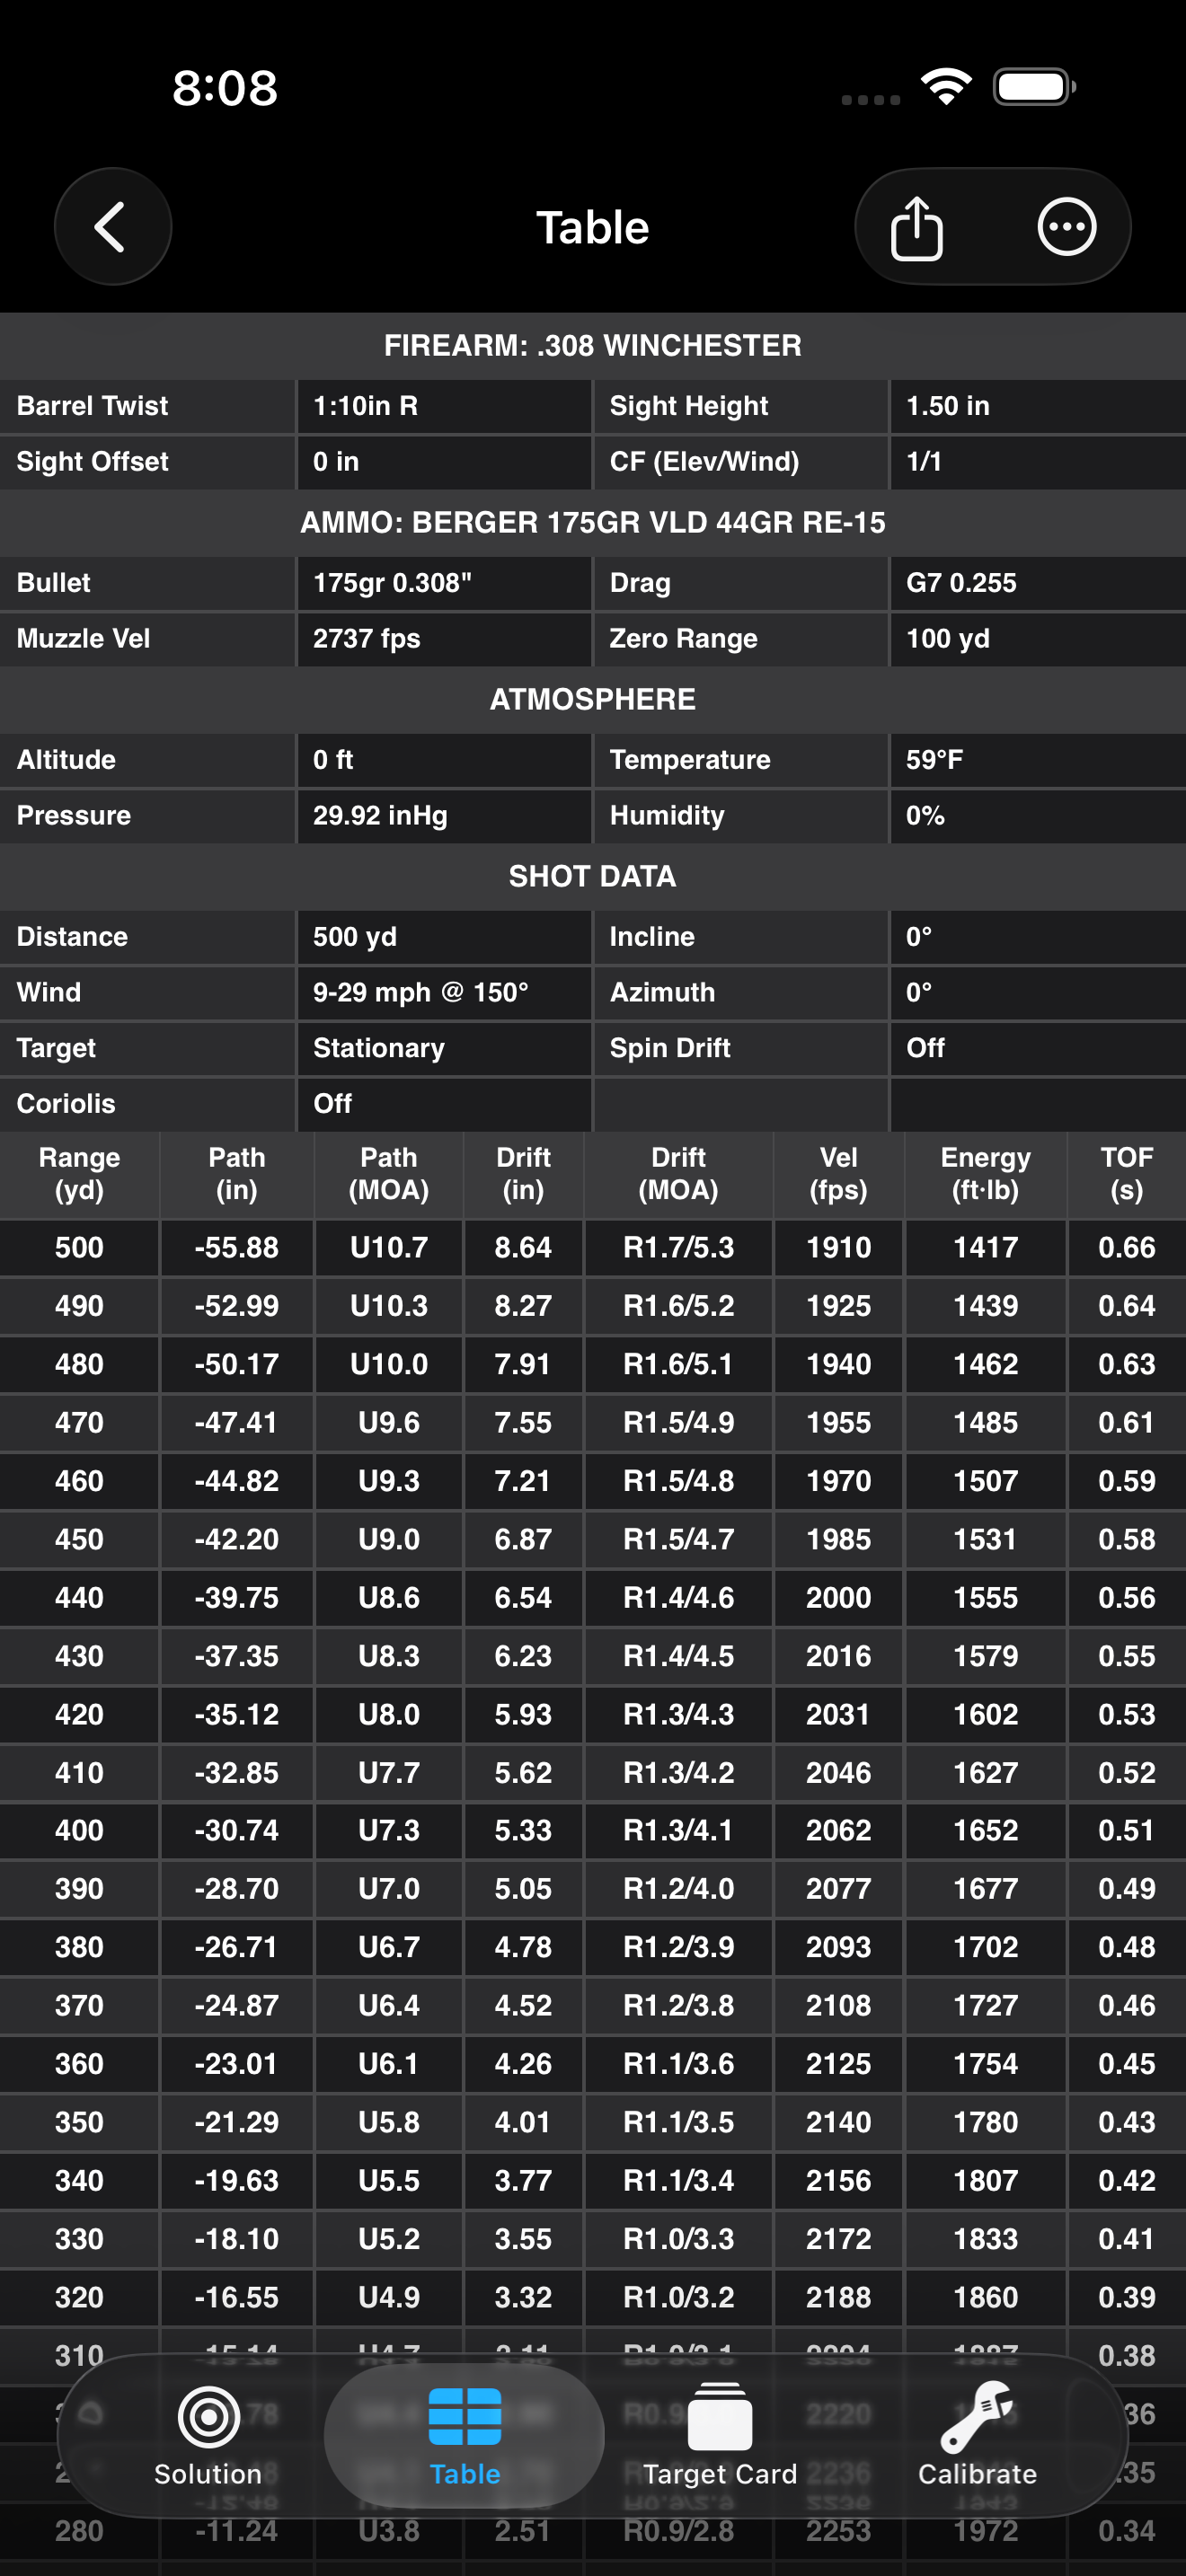 Trajectory Table
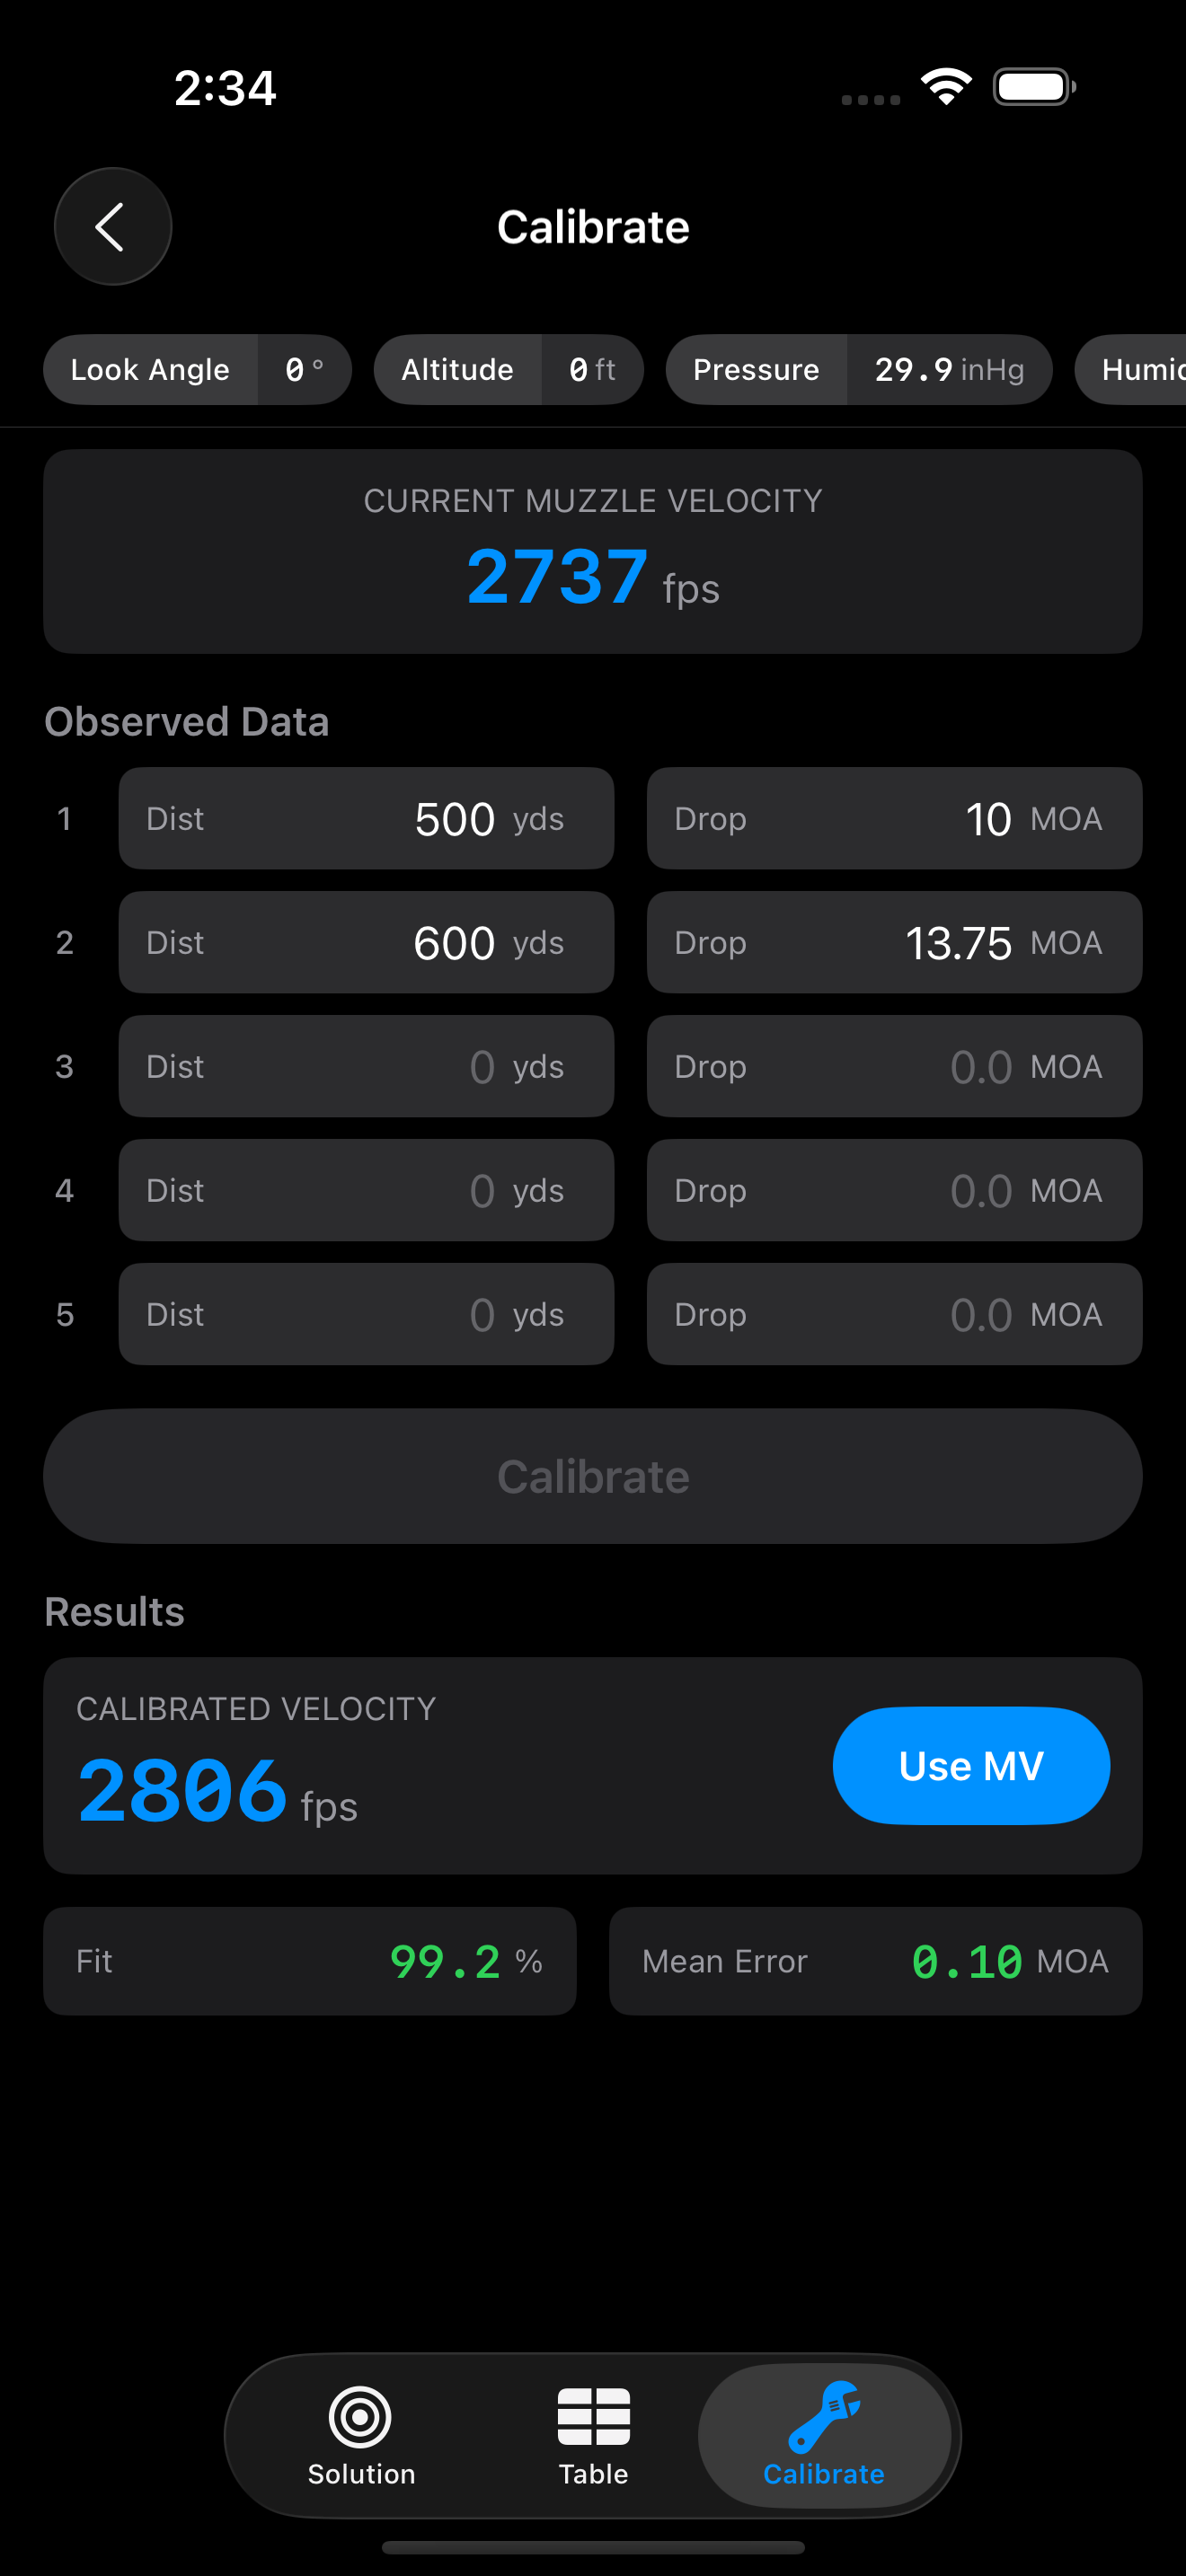 Truing / Calibration
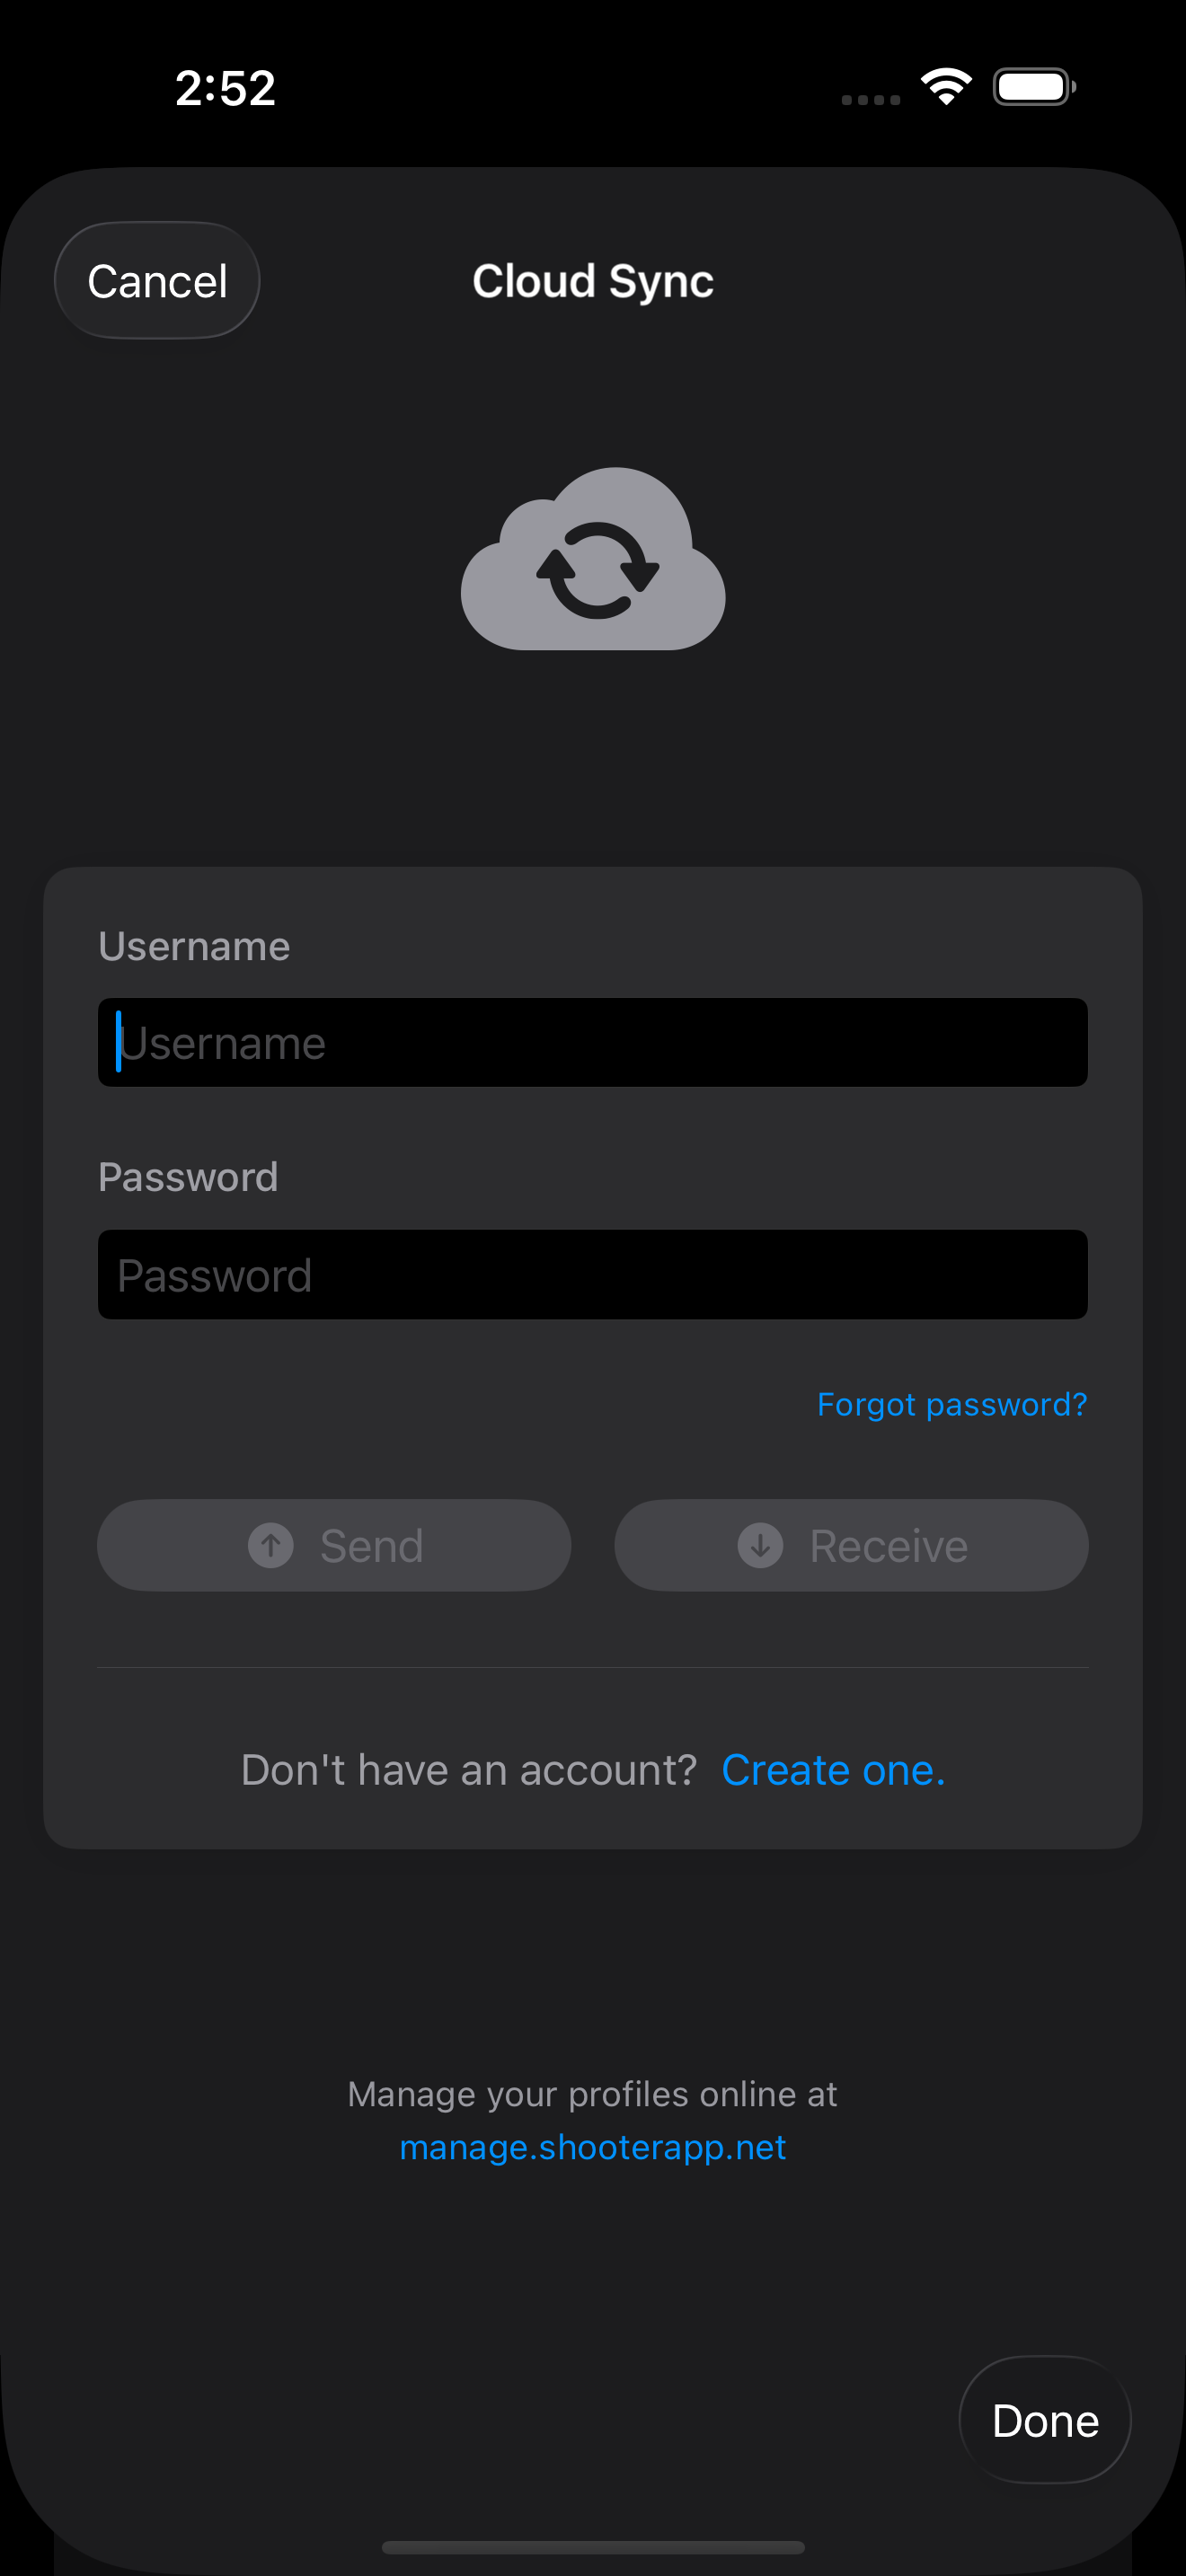 Cloud Sync
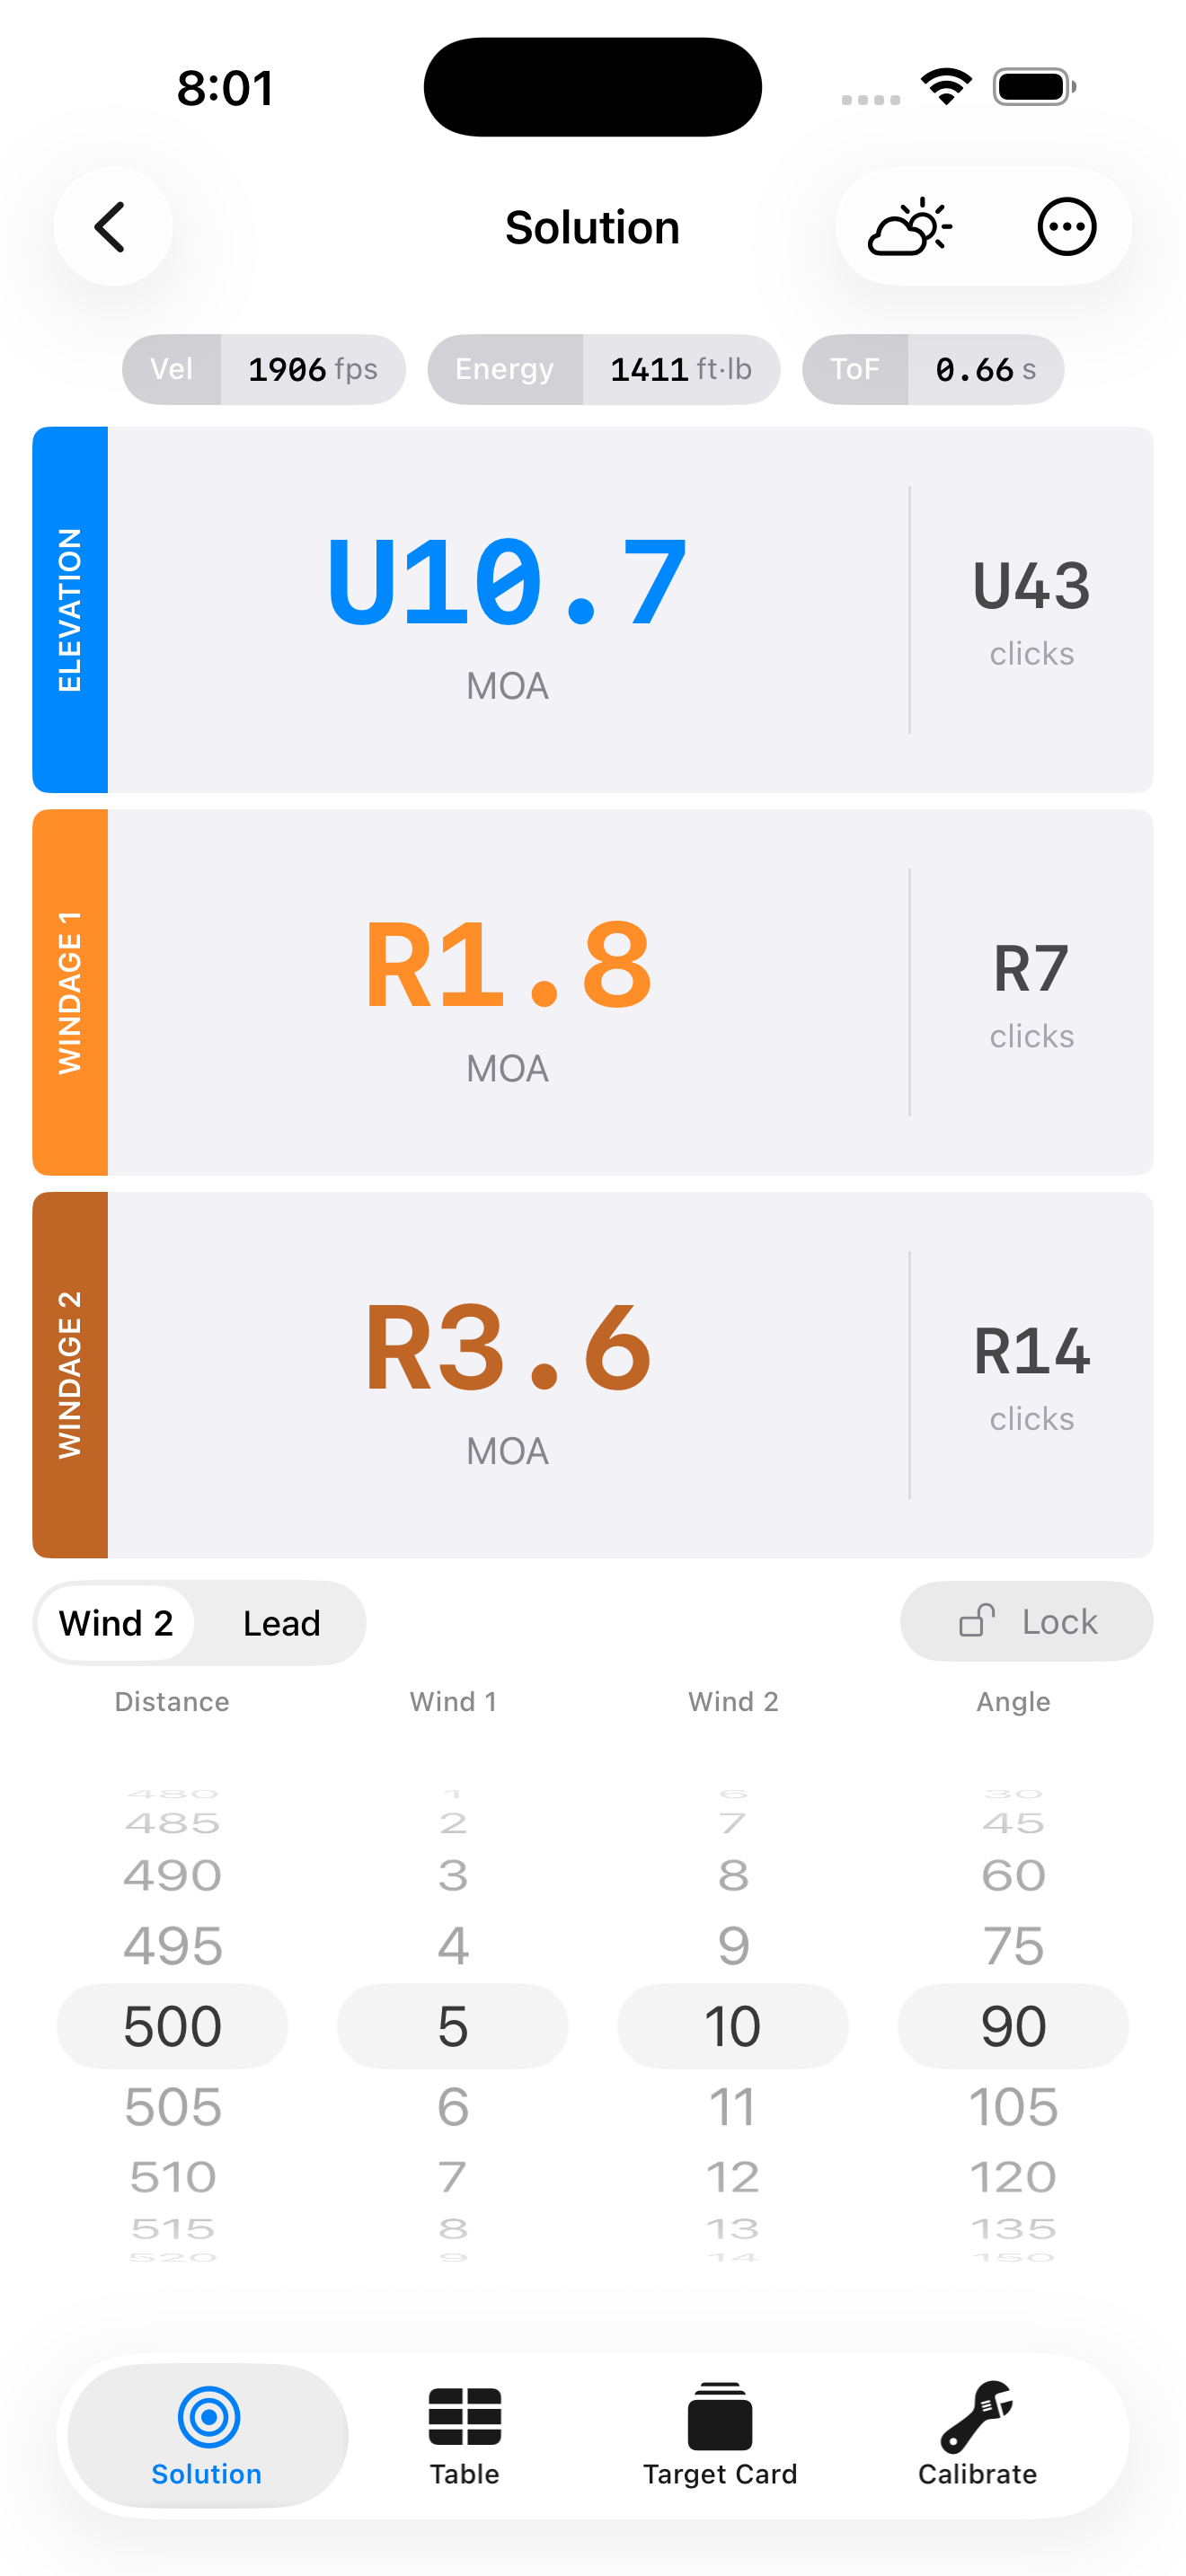 Solution Screen (Field, light theme)
 Solution Screen (Advanced, light theme)
Join thousands of long-range shooters who trust Shooter for accurate ballistics solutions.